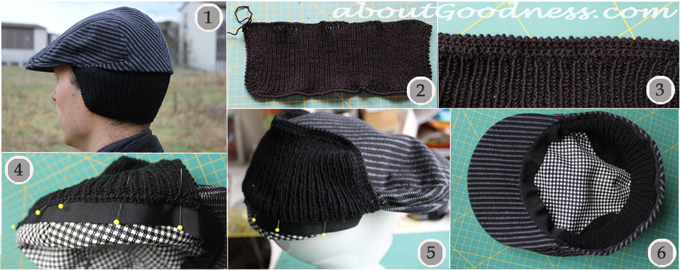
 When you make Gatsby Hat or Flat Cap for that Special Man in your life to keep his head warm in cold weather- you might want to consider adding EARFLAPS to it. Earflaps that look good, stay close to ears when being worn, and do not make the hat look clumsy and big, when being tucked inside the hat. The Special Man will appreciate that his head and ears can be WARM without compromising on the STYLE. In the picture you can see that hat is worn with earflaps tucked inside – there is no evidence that they are there at all. It was exactly what my Special Man asked for.
The free pattern and tutorial for the Gatsby hat you can get in my post about MEN´S FLAT CAP / GATSBY HAT: PATTERN AND TUTORIAL.
Once the hat is made – follow the tutorial below to make the earflaps to your hat.
Adding earflaps might work also with ready made hat that you already have. You need to make sure that hat fits the head a bit loosely because earflaps will take a bit of space once tucked inside the hat.
STEPS OF HOW TO MAKE EARFLAPS (picture 1) FOR FLAT CAP / GATSBY HAT:
STEP 1: Measure the distance on the hat – from one corner of the brim, around the back side of the hat to the other corner of the brim. This is how long earflaps´line needs to be.
Then measure the distance from the edge of the hat over the ear to the point where you want the earflap to end – this will be the width of earflap line. Now you know the required size for earflaps.
STEP 2: You can either use fabric of the hat, choose other fabric (it can be jersey type) or make elastic knitted line for earflaps by knitting it 1 knit, 1 purl (picture 2).
Since I was asked to make sure that earflaps would not be visible when worn tucked inside the hat – it was very important that earflaps would be made out of rather thin material. However, the challenge was to make sure that earflaps still would be enough warm, and very important – stay close to head, protecting ears from wind when worn down. That´s why I chose to knit them – with thin yarn and needles. My knit was rather stretchy. If I simply put it on the table without stretching it – it looked about 2 times shorter than necessary for the length (picture 2).
I used size 2.5 mm knitting needles. The yarn had appropriate thickness. Here is how to test if the size of knitting needles is correct for the yarn – pierce the paper with one needle and then pull the yarn through the hole. When the thickness of yarn fits the hole – it is the right size for these needles. If yarn goes through the hole too loose – either the yarn needs to be thicker or the needles size smaller. If the paper hole gets torn while pulling the yarn through it – then either yarn needs to be thinner or the needles bigger.
For the earflaps of this hat I needed to cast on 76 stitches that I knitted 1 knit, 1 purl. When the width was 1 cm smaller than it should be – I started to bind off in each row 2 stitches from both side, 2 times, so on each side I bound off 4 stitches, on final row I bound off 1 stitch from each side. It was needed to create rounded corners around ears (picture 2).
STEP 3: Pin the earflap line to the hat and check how well it holds around the ears. You can test it either on your special guy or if he is not available – then on yourself. Testing and trying on is important step because you want to make sure that earflaps cover the ears properly when worn down. Depending on the material you have chosen – you will see how much you will need to pull it tighter together around the corners for ears, and on the back of the head.
If you make earflaps from fabric – do this step by sewing (you can use bias tape for the down edge).
If you have knitted earflaps (like I did) – I suggest you to crochet several lines around 3 sides of the earflaps (picture 3). I did not crochet on the edge of earflaps that would be sewn inside the hat to avoid making it bulky.
Test how well the earflaps surround the head, adjust the edge where necessary. Once you are satisfied with the result – you can go to the next step and sew the earflaps on the hat.
STEP 4: Place the earflaps inside the hat. You need to decide how you want the seam to be – either it is folding when the earflaps are worn down or when they are tucked in. I decided that for knitted earflaps it is better that they fold over their seam when they are tucked inside, and that earflaps remain straight without folding line when they are worn down. Your decision will influence the way you pin and sew them inside the hat.
I put the earflaps inside hat in such way how they should be positioned when worn down, and pinned them to the hat´s inside ribbon (pictures 4 and 5).
Once the position of earflaps is correct – sew them on the ribbon by hand (if fabric – you can sew with machine).
You can see on the picture 6 that earflaps were folding over the sewing line when tucked inside the hat. If you choose to have them folding when they are worn down – you need to pin and sew them on the hat in the other direction.
It takes a bit of patience to try on the hat several times while adjusting the outside edge of earflaps or the place where they are attached to the hat. However, it does pay off, when your wonderful man is happy with the result of how his cool hat with earflaps hold onto his head :-)
Let me know if you have any questions or comments about this tutorial!


This is absolutely awesome!!!! I am so making one, two, three…why stop LOL Thanks so much for the generous gift. The detailed tutorial makes it look so simple.. I actually understand it. :D
Hi. I just wanted to let you know that I’ve given you a Liebster blog award. You can see my post here: http://notyouraveragecrochet.wordpress.com/2012/01/06/liebster-award/
Keep up the great posts!
thank you for sharing!
I really love this type of hats!
You have great DIY posts. The coat looks really cute :)
Ladies, thank you for letting me know your opinions – they help me and mean a lot! Thank you for the time you have taken to write your comments!
Wow you’re putting me out of business your work is so good!