JOURNEY FROM SHAME TO FAME
 I was making for myself a simple coat (my first self made coat, so my level of confidence allowed to choose only simple pattern), but even though it was a simple coat, (my huge ego demanded that) it still had to be my VERY SPECIAL COAT. I was wondering, what magic I could apply to make a simple coat turn into THE SPECIAL COAT?
Below you can read the TRUE STORY of behind the scenes of how it all happened that I chose to change some minor details (tolerable risk for me) in the pattern that improved the looks of the coat, and then added LACE DETAILS to cover up my mistake and IMPROVE THE LOOKS of my coat SIGNIFICANTLY (in my very not-humble opinion about my own work, and in the biased opinion of my husband about the work of his adorable darling wife).
DESCRIPTION OF IMPROVEMENTS AND MISTAKES HIDDEN AWAY:
I needed a WIDE COAT (my belly grows bigger and bigger, and will keep doing so until the Little Dragon will burst out of it).

Since I was determined to make my own coat, I figured out – my efforts should be put into a coat that I would wear also when being back to my regular shape.
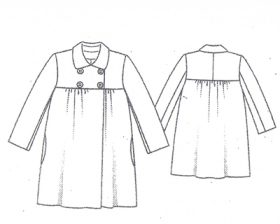
So, I chose this simple pattern from Burda magazine, 01/2011. You can see in the picture that originally the pattern of this coat had 2-piece slim 3/4 sleeves, the sweet turn-down type of collar (not my style at all), and it was meant to be rather short.
First of all – I dislike to follow instructions of any kind, and I always must bring in some touch of innovation (or at least- simply ignore the instructions and make the mistakes my way).
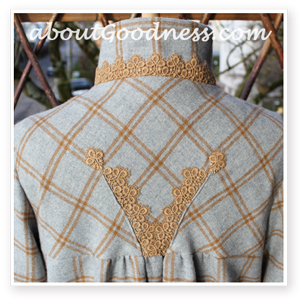
Second, I used checked fabric that I wanted to play with to create more interesting look. You can see the result on the top part of the coat and turn-up parts of the sleeves (pictures 1&10).
Third, I wanted a longer coat with full length, comfortably wide, turn-up sleeves and high collar (picture 2). I changed these details by drawing over the pattern in a way I assumed it should be.

Then I noticed that top back part of the coat had a cut in the middle to give it a better shape. I decided that it was a waste of time and energy – as the coat would anyway be wide, there was no point in making this (unnecessary) seam. Welcome disaster decisions….

I confess- the idea about adding lace to my coat started as a desperate attempt to save my mistake created when I thought of myself to be genius (I quietly still have the genius opinion of myself) and made that shortcut in pattern for the back part). Guess what happened… Picture 2 happened! The fall of coat on my back looked really ugly (which screamed so loud: “She was lazy!!! She had no clue what she was doing!!!”, that my huge ego simply could not handle it, and I had to find a solution to turn that shame into fame).
When I was pinning the folds on the back of coat to get rid of ugly looks, it looked so weird, that even my husband dared to ask me, if I could maybe add some kind of applique or lace to cover that mess… I snapped him back with: “Yeah, I know, that´s what I was planning to do!”
I went through my stash of lace collection (gathered during my thrift store visits) and was relieved to find a matching color lace (picture 3). Its length allowed to me continue playing, so (see the picture below) I used it to embellish not only the back of the coat, but also the collar and sleeves (and as it turned out – above all, I had embellished my pride and self esteem).
STEPS OF ADDING LACE TO THE BACK OF THE COAT (picture tutorial above):
STEP 1: I pinned the lace (picture 3) in the shape of “V” on the back of the coat (picture 4) where I needed to fold in extra fabric on the back that was creating ugly fall. I sewed lace on by hand all around it.
STEP 2: Then I pinned fabric over the lace in a way that folded inside the new seam the extra fabric I wanted to get rid of (picture 5). These seams I sewed by machine.
STEP 3:I noticed that the top points of the new seams (picture 6) were not looking nice – kind of popping out of the coat, so I cut out 2 motives from the lace and sewed them by hand on the top of the seams which created a nice look (picture 7).
 STEPS OF HOW TO MAKE TURN-UP SLEEVE with bias and lace details:
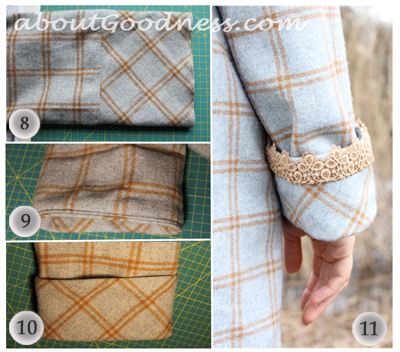
STEP 1: Add a wide line of bias fabric to the edge of the sleeve (picture 8). Length is determined by the preferred length of turn-up plus 4 cm of edge that is folded inside the sleeve.
STEP 2: Pin the seam up (towards the top of the sleeve) and sew around it, about 3 mm from the previous seam. Then fold the added line inside the sleeve (picture 9).
STEP 3: Sew by hand the added line inside the sleeve, near the edge of this line. Then put the turn-up sleeve in its correct position (picture 10). Afterwards you can pin on it the lace and sew on by hand (picture 11).

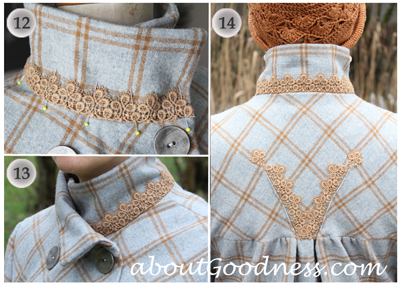
TO ADD LACE TO THE COLLAR: pin the lace along the collar line (picture 12) and sew it on by hand (picture 13).
LAST NOTE
I was so happy about the result of my lace embellishment work, that I could not help it and simply had to make a picture TUTORIAL out of it, hoping that somebody else might get impressed inspired by seeing what a magic touch of lace can do to change the mistakes and looks of garment.
There is also a tutorial and pattern for making CROCHET CLOCHE HAT WITH LINING that is very comfortable to wear with high collar clothing, big scarf or cowl. This cloche hat covers your head and ears properly, and at the same time keeps your beautiful earrings visible – adding more charm to your looks :-)
Let me know if you have any questions or comments about this tutorial!

This is a really great idea, it looks so cute!
Nicole http://loyaltofashion.wordpress.com/
xxx
Thank you, Nicole!
What a beautiful coat, one I love to add to my wardrobe. This is what makes an artist in all of us…see it an opportunity to expand and personalize. Make it our own. I love your great sense of humor (your husband’s too) and style. And I already told you how I love the cloche. Yes, I will get to mine once I get catch-up on my knitting deadline :D Thank you again for your inspiration and encouragement. I couldn’t be more blessed to discover you, my daily resting pad :D
Sarah, thank you for both feedbacks – on coat and on the hat! And most of all – thank you for those wonderful colors that you use in your work – they are so inspiring!
I meant to post here about the coat. It looks great, but the other DIY about the hat was also really nicely done. Thanks for sharing.
Thank you for both comments, especially for the coat! :-)
Wow! What a save – first in thinking to use lace as a cover-up (not often seen on coats) and then to have just the right color and weight of lace in your stash! Wonderful!! The coat was beautiful before, but once we know the whole story, it seems even more special. Love It!!
Thank you for your very kind words, Linda! :-)